
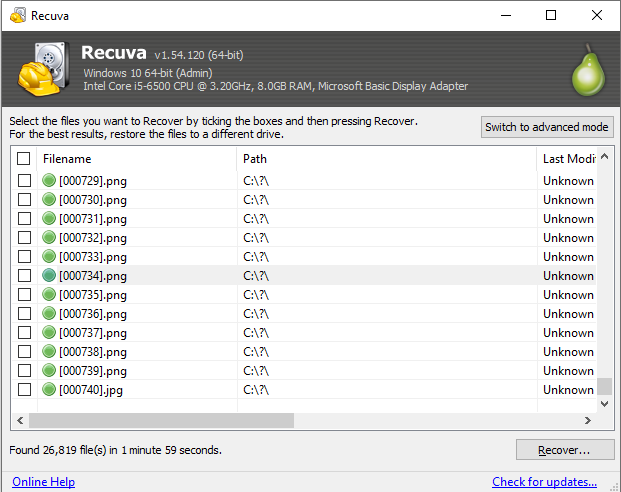
Recuva offers two different mental models: a quick scan that asks the filesystem what it still knows about deleted files, and a deep scan that reads the volume more like raw sectors and tries to match known file headers. Neither mode is “better” in the abstract—the right choice depends on how long ago the delete happened, what else touched the disk afterward, and whether the directory layer is still trustworthy.
This guide is written for people who are already stressed: you need a decision rule that is easy to remember, a checklist so you do not scan the wrong volume, and a way to read noisy deep-scan results without exporting gigabytes of junk. recuva.us is an independent educational site; always verify downloads and UI labels against the build you actually run.
When quick scan is usually enough
Quick scan shines when Windows still has coherent metadata for the delete. Typical examples include files you sent to the Recycle Bin and only recently removed, deletes on lightly used volumes, and cases where you have not yet run large installers, game patches, or backup jobs that rewrite lots of clusters.
You will often see plausible paths and filenames quickly, which makes triage dramatically faster. That matters because every minute on a sick disk is also a minute where background tasks—indexers, updaters, sync clients—might be writing new data. If quick scan already lists the file you care about with a sane path and size, treat that as a strong signal to recover now instead of chasing a deeper pass “just in case.”
Signals that you should switch to deep scan
Deep scan becomes worth the time when the filesystem layer is thin or misleading: emptied Recycle Bin long ago, shift-deletes on busy disks, corrupted indexes after a bad shutdown, or removable media that was reformatted by mistake. In those situations, quick scan may return nothing—or return partial rows that do not match what you know you lost.
- You know the approximate filename or extension, but quick scan shows nothing relevant.
- The delete happened on the same day as a big OS update, a restore operation, or a large copy job.
- You are recovering from a camera card or USB stick where the folder structure no longer matches what the camera wrote.
- You already recovered “something,” but previews fail or hashes do not match a known-good reference.
What deep scan really costs (beyond time)
Deep scan is not “free except patience.” It increases CPU load, keeps the disk busy for long periods, and can tempt you into mass exports that fill the destination and add more filesystem churn. On SSDs, sustained reads are usually fine, but you still want to minimize writes on the source volume until you have what you need.
Expect more generic names, more false positives, and more “found” files that are actually fragments or older versions. That is normal: signature-based recovery cannot always reconstruct the original directory entry. Your job is to filter ruthlessly using size, type, path fragments, and timestamps—then export in small batches and open files early.
Before you click scan: a five-point checklist
- Correct volume: confirm the drive letter or physical disk is the one that held the data.
- Destination space: ensure the recovery target has headroom for the largest plausible file plus overhead.
- Stable power: laptops should be plugged in; USB hubs should be powered if possible.
- AV exceptions: some security tools slow or block mass reads—plan ahead to avoid mid-scan surprises.
- Stop new writes: pause installers, torrents, and heavy sync jobs on the source disk.
How to triage deep results without drowning
When the list explodes, sort by columns that separate signal from noise: file type, size bands, and any path fragments that point toward real user folders (Documents, project roots, camera DCIM paths). If you are hunting one precious file, export a handful of close matches first rather than selecting hundreds “to sort later.”
If two candidates look identical by size and type, treat them as hypotheses: export both, hash them, and open them in the real application (Office, Adobe, your archive tool). Undelete tools can surface plausible bytes that still fail at the format level—especially for databases, virtual disks, and encrypted containers.