
Field guide
Recover files you thought were gone, without the panic.
Recuva is a proven Windows undelete tool. We map the real UI, a tight recovery playbook, and the hard limits, so you act fast and avoid making things worse.
- Scan
- Deep
- OS
- Windows
- Media
- Disk · USB
No sketchy bundles
Guidance to spot repacks and installer traps.
Limits, spelled out
TRIM, overwrites, failing media: no fairy tales.
Calm sequence
From first shock to files on safe storage.
01 · Site map
What you can read here
One slice per page: expectations, what Recuva can do, workflow, real cases, and when scans go sideways.
Why this guide exists
Sites, hype, and honest expectations before you install.
OpenCapabilities
Wizard vs advanced, deep scan, types, drives, secure delete.
OpenWorkflow
Stop writes, match scan depth, recover to another disk.
OpenScenarios
Bad ejects, shift-delete, flaky USB, SSD realities.
OpenSupport angles
Slow scans, previews, AV blocks, when to stop pushing.
OpenBlog
Deep scans, SD hygiene, TRIM, longer bookmarkable notes.
OpenPrimer · Line up the basics
Before the wizard: a four-point checklist
A few minutes of prep cuts down wrong-volume scans, destination disks that fill mid-run, and permission surprises—especially on shared PCs or loaner laptops.
Destination disk ready
Decide where recovered files will land before you start. Leave more free space than your largest must-save file, and use a dated folder so you never mix two scans in the same tree.
Know which volume is which
Open Disk Management and note capacity and label beside the drive letter. Cheap hubs and card readers love to reshuffle letters after sleep or reboot—easy way to scan an empty slot by mistake.
Elevation when partitions hide
Some volumes only show up to an elevated session. If Explorer looks empty but you know data lived there, try Run as administrator on the tool after a trusted install—still recover out to another disk.
Pause “repair” prompts
CHKDSK /f, partition wizards, and “optimize” utilities rewrite metadata while you still hope to undelete. When the data matters, image or clone read-only first, then decide on repairs.
Logging drive letter, scan mode, and start time in a sticky note helps when you need a second pass tomorrow—or when you hand the story to support angles or a lab. After files land safely, follow after recovery to verify before you reuse the sick volume.
02 · Quick start
Three habits that buy you time
Recovery is often a race between you and the next overwrite. These three habits do more than any single checkbox in the app.
-
1
Freeze the sick volume
Close installers, torrents, and heavy sync on the disk you need to scan. If Windows is unstable, consider portable mode from another drive.
-
2
Start shallow, go deep if needed
A quick pass is enough when the Recycle Bin just emptied. Deep scan is for reformats, corruption, or when the file system no longer lists names you recognize.
-
3
Recover to a different disk
Never write recovered files back onto the partition you are scanning. Use external storage or a second internal volume with free space.
Reality check
- Excellent in the list is a hint, not a promise. Open the file after recovery.
- Modern SSDs with TRIM may leave little recoverable data. Backups beat undelete.
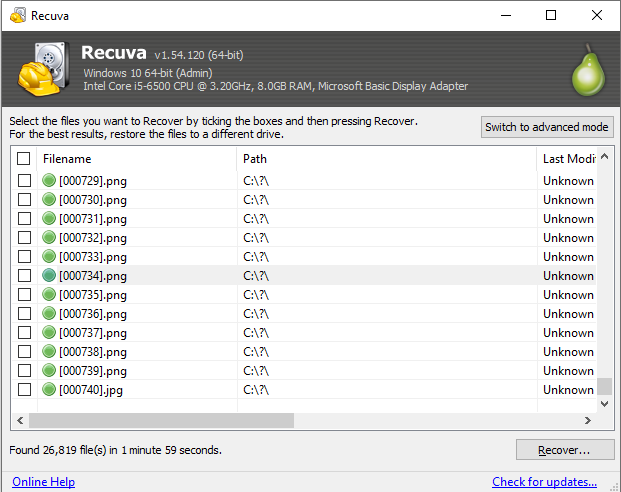
- After deep scan, generic names are normal; you sort by type, size, and path.
- Laptop on battery can sleep mid-scan and confuse removable media—plug into wall power for long deep passes.
- If the file only ever lived in the browser or a sync-only folder, check the service’s version history before you assume the disk still has blocks.
- Clicking drives that click or drop offline risks more damage; imaging first is the pro move.
Pulse · First hour
What to do before you even open Recuva
Quick start covers habits; this is a simple clock. The goal is fewer surprise writes while you still remember which folder, app, or card was involved.
-
0–10
Stop the bleeding
Close games, installers, and heavy sync on the affected disk. If the loss is on a USB stick or SD card, eject safely only after writes have stopped—then label which device it is so you do not mix it up with another.
-
10–30
Parallel rescue paths
Check phone cloud galleries, email attachments, and shared drives—often a copy exists where undelete never needs to run. On Windows, Previous Versions (right-click folder → Properties) sometimes surfaces an older snapshot; if it does, copy out from there before you lean on deep scan.
-
After
Then run the tool
Download from a channel you trust, confirm the file’s digital signature when Windows asks, then run a shallow pass first unless the volume is RAW, reformatted, or obviously corrupted. Log the drive letter, scan mode, and output folder—you will thank yourself if you need a second pass tomorrow.
Shadow copies and cloud duplicates do not replace backups, but they can save hours when the stars align. When nothing else appears, continue with scan picker and workflow.
03 · In the UI
What you are looking at on screen
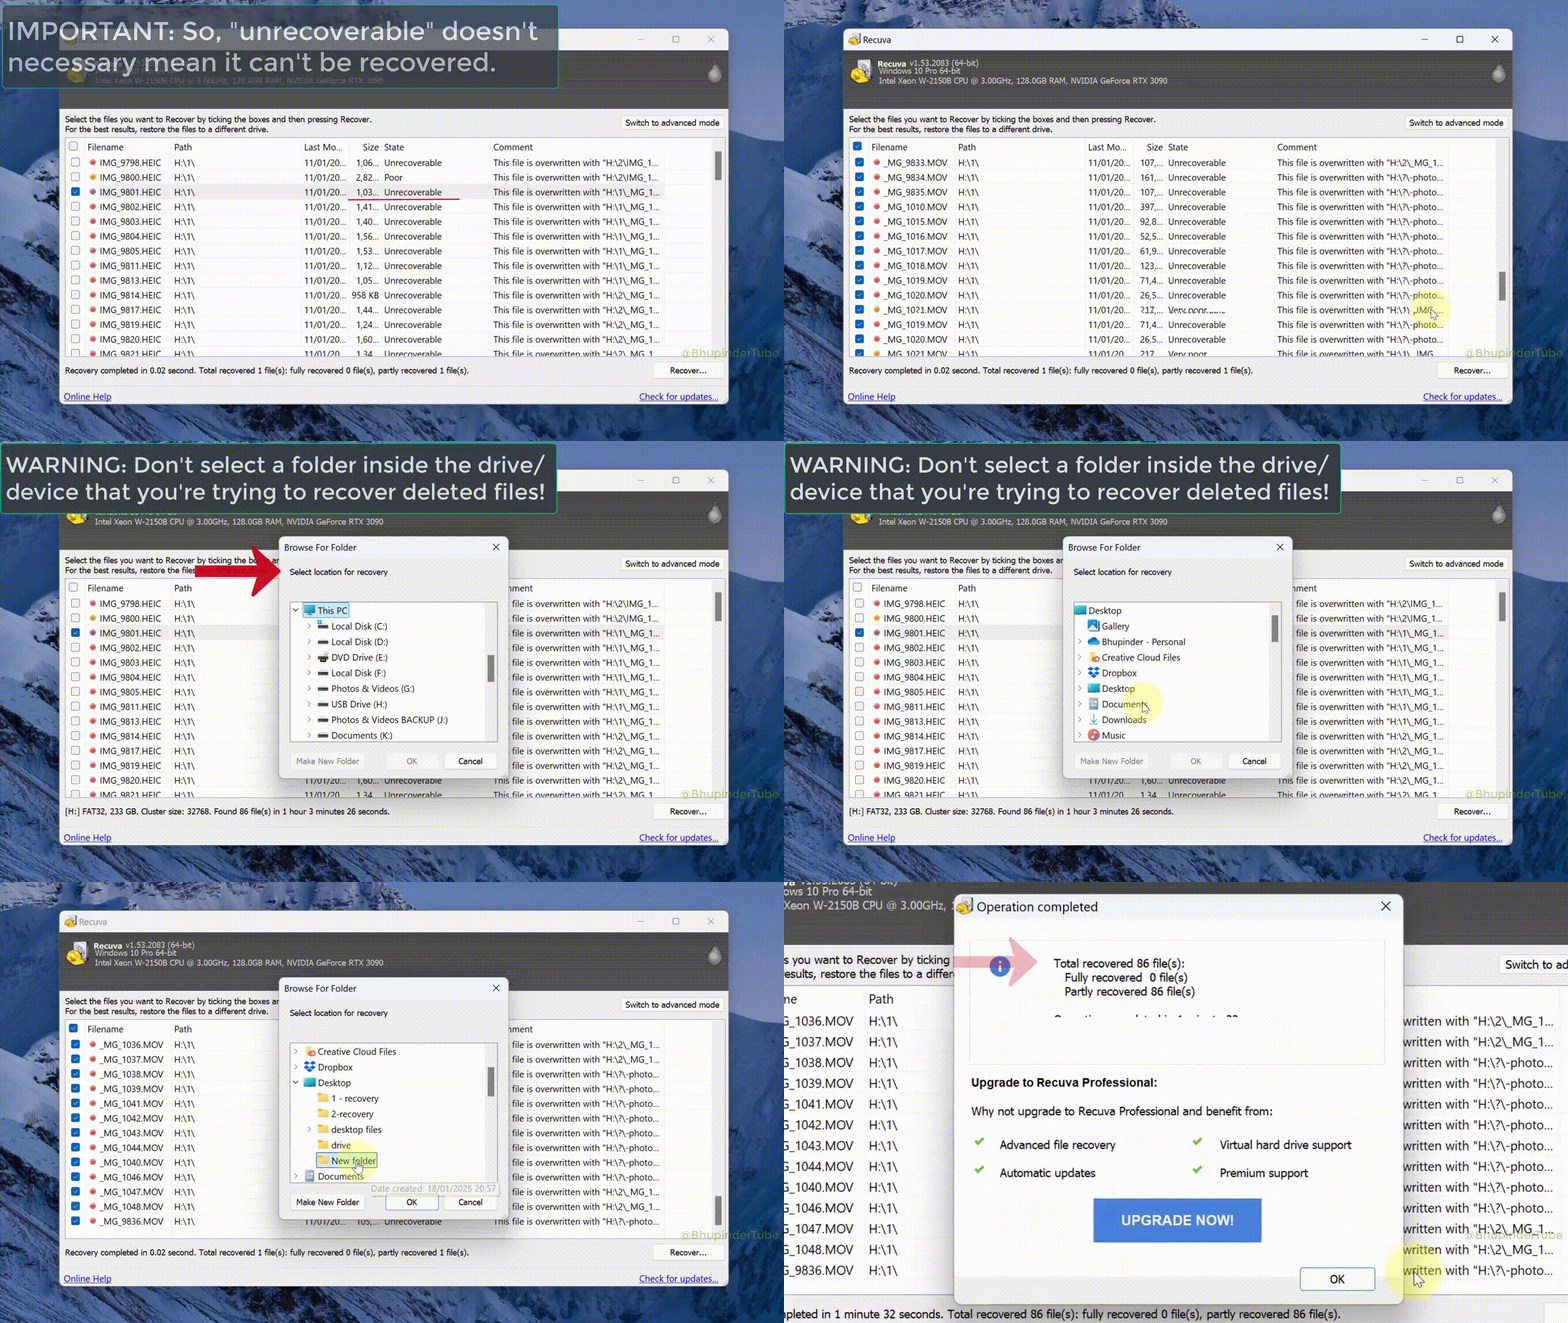
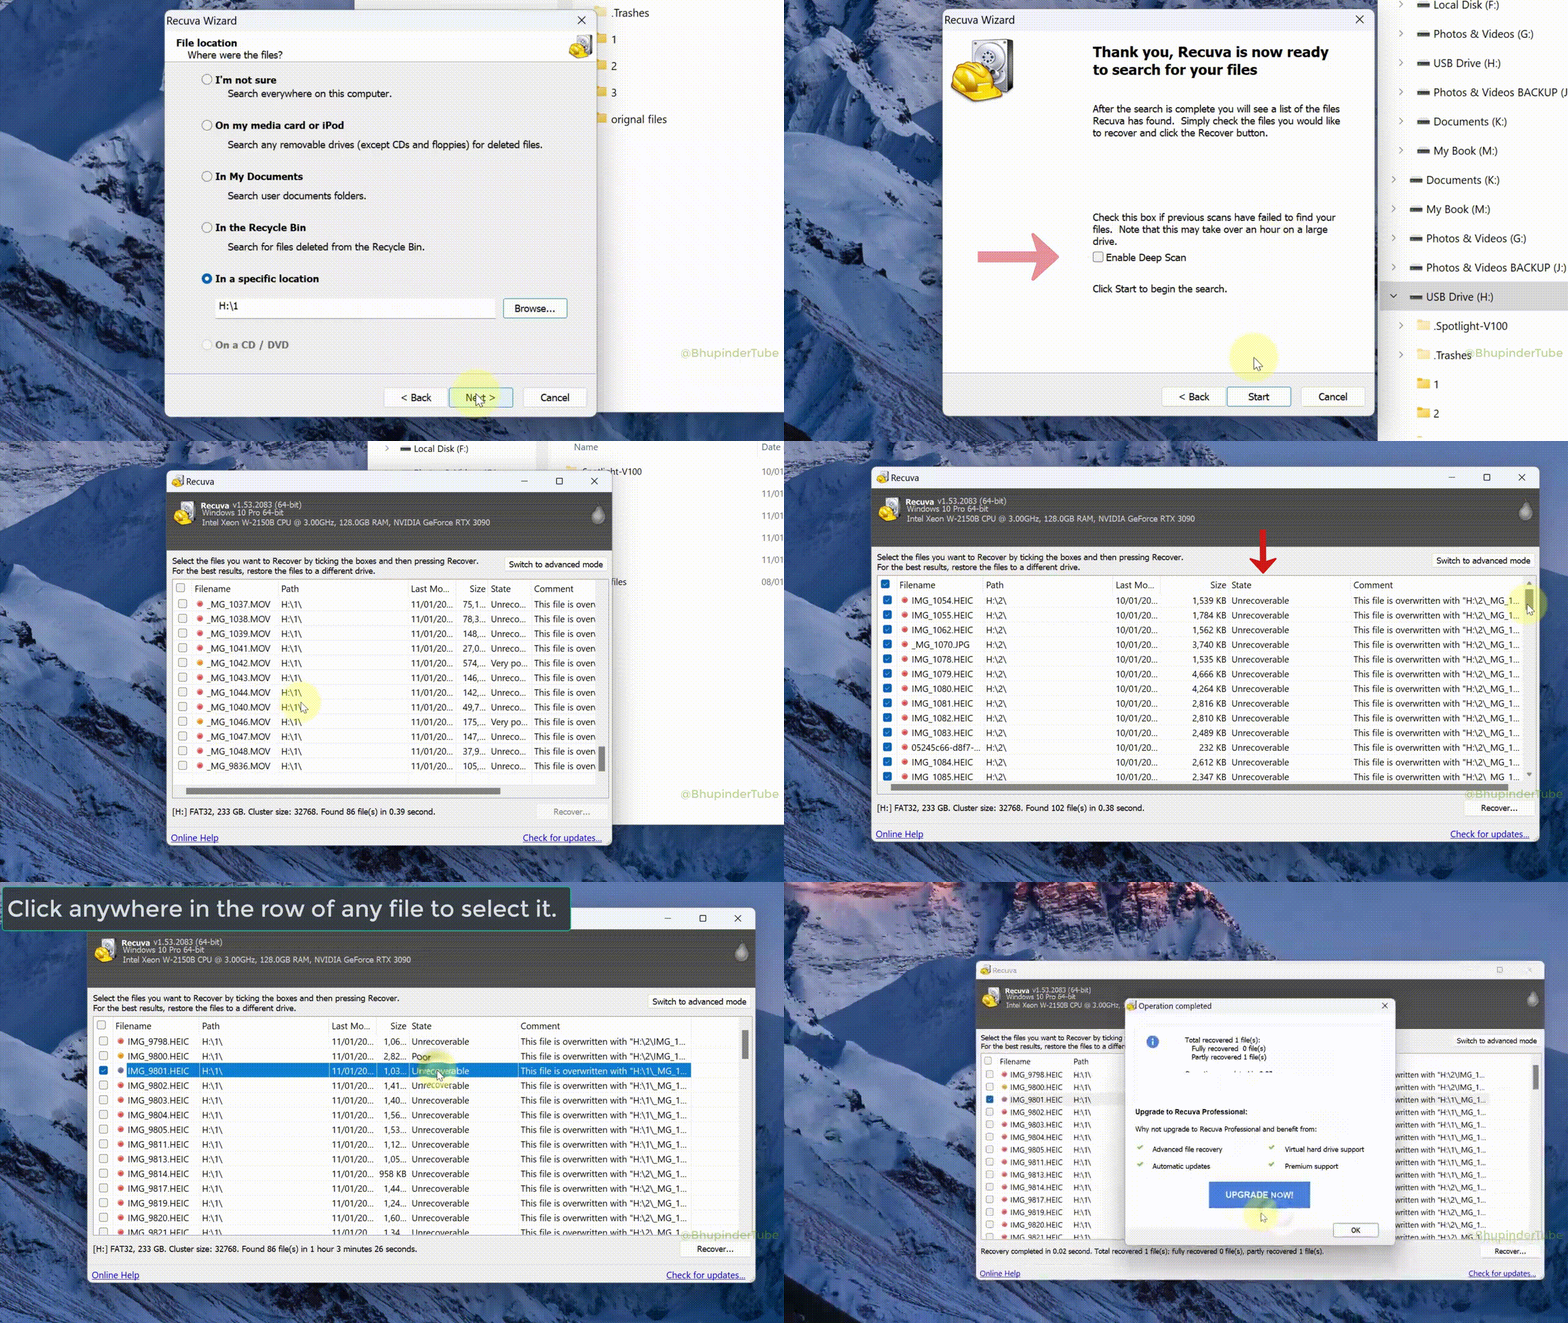
Recuva walks you through drive selection, scan options, and a sortable list of candidates. Progress and elapsed time tell you whether to wait or come back later.
- Path and filename columns help you tell a real document from noise when the name was lost.
- State labels summarize how likely a block is still intact; treat them as guidance while you verify.
- Preview is not universal; a bad preview does not always mean the file is gone.
- Size and modified date (when shown) help you match a deep-scan candidate to the file you remember—even when the name is a random string.
- Progress and ETA are rough; USB bridges and bad sectors can stall percentages. Note the elapsed time if you need to resume or compare runs.
Labels and layout change slightly between versions. When in doubt, match what you see to the capabilities page and your own notes before you recover hundreds of files at once.
04 · Safety
Do this · Avoid that
Small mistakes after deletion erase more data than the original delete. Use this as a checklist before you leave the keyboard.
Prefer
- Image or clone failing disks before endless retries.
- Download only from sources you would trust with your OS image.
- Verify a few recovered files before you batch-restore everything.
- Keep a paper trail: which disk, which scan mode, where files landed.
- Unmount or safely eject the sick card or stick before you move the PC—fewer surprise writes from autoplay or indexing.
- Confirm the recovery destination has headroom for the whole run before a deep scan; a full disk mid-copy can truncate the only good copy you find.
Avoid
- Installing recovery tools onto the same partition you are trying to save.
- Running “optimizer” or cleaner apps while a scan is in progress.
- Trusting mirror sites with extra bundled installers or odd filenames.
- Assuming one green flag in the list means the wedding photos are definitely back.
- Letting backup software “reconcile” or reformat the volume you are still hoping to carve—pause jobs until recovery is done.
Detour · Parallel rescue
Copies that skip undelete
Sometimes the file never depended on carving free clusters. Checking built-in Windows history and cloud trash first can save hours—and avoids another write pass on a tired disk.
Previous Versions & File History
Right-click the parent folder → Properties → Previous Versions when shadow copies exist. If File History targeted that library, restore from the dedicated drive before you commit to deep scan.
Cloud trash & version history
OneDrive, Google Drive, Dropbox, and iCloud for Windows often keep online recycle bins or file versions. Sign in from a browser, recover there, then copy down—undelete on disk is Plan B if the sync already removed local bytes.
Phones, tablets, and messaging
Photos may still live in the camera roll, vendor cloud, or chat backups. Ask whether the “lost” file was ever fully downloaded to the PC you are scanning—mobile galleries and email attachments beat fighting TRIM on the wrong device.
When any of these paths work, copy the good files to a neutral disk before you experiment further. For messy real-world threads, the Scenarios page groups SD cards, installers, and SSD limits in one place.
06 · Decision aid
Which scan should you try first?
Use this as a rough map, not a guarantee. Drive health, encryption, and how long ago the delete happened still matter more than any table row.
| What happened | Start here | If that is weak |
|---|---|---|
| File in Recycle Bin or deleted minutes ago | Wizard or quick scan on that volume | Deep scan; keep the PC idle while it runs |
| Shift-delete or emptied Recycle Bin | Quick scan on the same drive letter | Deep scan; sort results by type and date if shown |
| SD card or USB “needs formatting” | Stop using the card; deep scan from a desktop reader | See Scenarios for reader and imaging notes |
| Partition shows empty, RAW, or wrong size | Deep scan after checking cables and ports | Image first if the disk drops offline or makes noise |
| Internal SSD (laptop or NVMe desktop) | Quick scan, then deep if files matter | Expect TRIM limits; SSDs & TRIM explains why |
| File existed only in a cloud-synced folder | Check the provider’s web recycle bin or version history first | Local scan helps only if a full copy was on disk; see Capabilities for path limits |
| Virtual disk (.vhdx / .vmdk) on a healthy host drive | Scan the host volume or attach the image read-only, then target the guest filesystem | Snapshots and differencing disks change what “deleted” means—check the hypervisor before you trust one guest OS alone |
Encrypted volumes need to be unlocked in Windows before Recuva can see anything useful. BitLocker, some corporate policies, and failed hardware encryption can all produce empty-looking scans even when the disk spins.
Formats · Honest expectations
Not every file type behaves the same
Recuva reads disks, not application magic. Some formats survive a partial overwrite better than others; some need every cluster in order. This is a practical lens, not a guarantee for your specific case.
Photos & simple video
JPEG, PNG, and many phone clips have clear headers; deep scan often finds them even when names are gone. Very large or fragmented 4K files may recover with glitches—always open the result in a real player.
Office, PDF, text
DOCX and XLSX are ZIP-like inside; a single bad sector can make Word refuse the whole file. Plain .txt and many PDFs tolerate rough recovery better. Save a recovered copy under a new name before you let Office “repair” it in place.
Databases & mail stores
SQLite, Outlook PST/OST, and similar monoliths need internal consistency. You might recover a file that mounts but throws errors—export what you can immediately and keep the raw recovered file as a second backup.
Archives & VMs
ZIP and disk images tie many pieces together; one missing chunk can break the whole archive. Test with 7-Zip or your hypervisor’s “verify” option. Partial VMDK/VHD recovery is still worth attempting if the alternative is total loss.
Mixed folders are normal: recover a sample of each type you care about before you queue hundreds of files. For edge cases, pair this with after recovery and support angles.
07 · Audience
Who this site is written for
You do not need to be in IT. You do need patience, a second disk for recovered files, and a healthy dislike for “one click fixes everything” marketing.
Home & family
Photos, school folders, and “I emptied the Bin by accident” moments on a single Windows PC.
Students
Laptops with one internal drive, USB sticks between classes, and tight deadlines when deep scans feel too slow.
Small offices
Shared folders, external backup disks, and the occasional “finance drive looks empty” panic before payroll.
Friends-of-IT
You are the person everyone texts first. You want a sane script to hand them before they install random tools.
08 · From the blog
Longer reads worth your time
These posts go past the homepage summary: when to commit to a deep scan, how to treat fragile cards, and what TRIM means for SSD recovery.
When to run a deep scan
Quick mode when the filesystem still lists deletes; deep when it does not. Expect time and generic names.
Guide Continue reading
SD cards: protect before scan
Stop using the card; use a good reader; recover to a PC disk, not back onto the card.
Guide Continue reading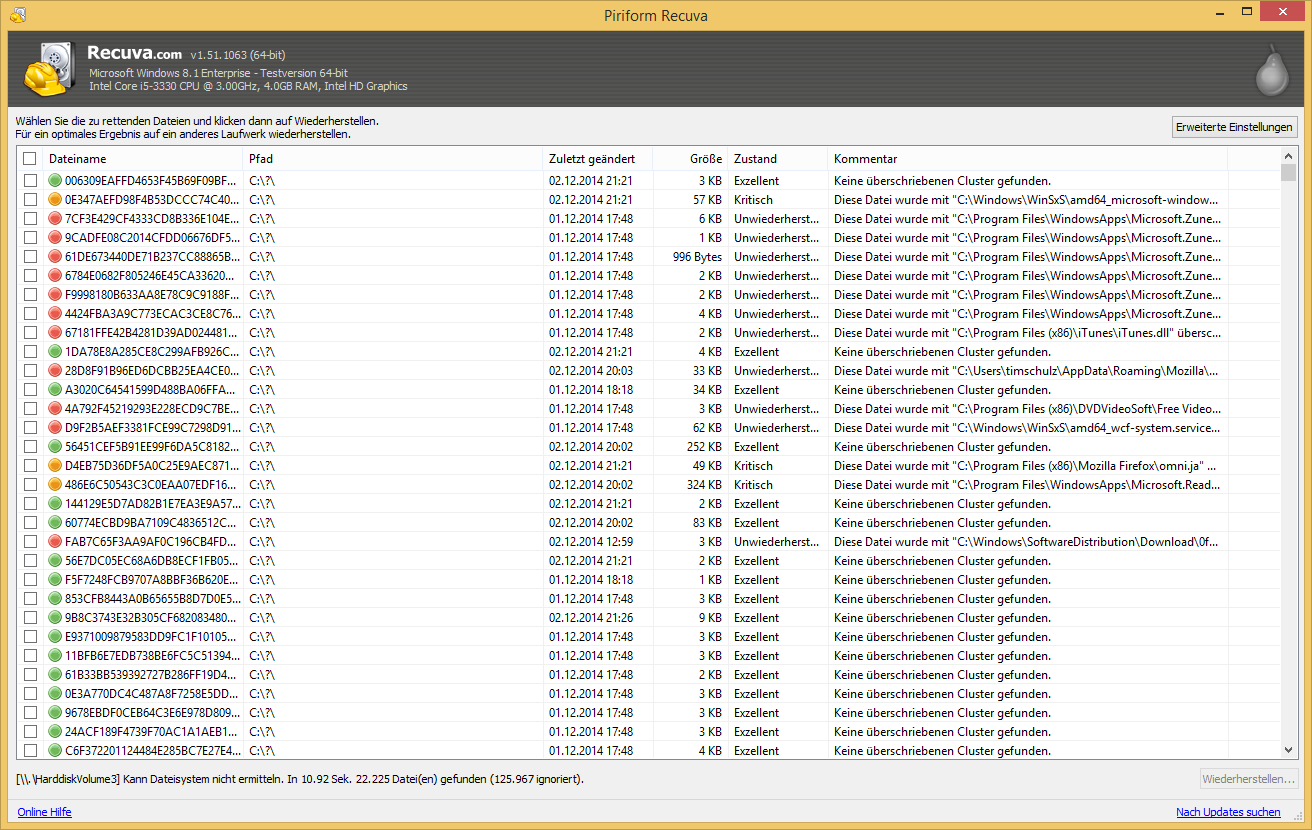
SSDs & TRIM
Internal SSDs often reclaim blocks fast. Backups and snapshots are the real safety net.
Guide Continue reading09 · Terms
Words you will see everywhere
Plain-language anchors so marketing pages and forum threads are easier to parse.
- Undelete
- Trying to bring back a file whose directory entry or clusters may still exist before new data overwrites them.
- Quick scan
- Uses filesystem metadata when it is still coherent. Fast, but blind to data that only signatures can find.
- Deep scan
- Reads the volume more like raw sectors and matches known file headers. Slower, with more false positives and generic names.
- TRIM
- An SSD feature that tells the drive which blocks are disposable. Great for speed, harsh for classic undelete success rates.
- Cluster
- The smallest chunk of disk space a file can occupy. Partial overwrites inside a cluster can damage part of a file.
- Recycle Bin
- A Windows holding area that keeps some deletes reversible until you empty it or policy clears it automatically.
10 · Install paths
Installer versus portable: what changes?
Both builds can run the same scans. The difference is how much they touch your system disk and how easy it is to run from a USB stick when Windows is unstable.
Standard installer
- Familiar “next, next” flow on a healthy PC.
- Watch the screen for optional offers; uncheck anything you did not intend to add.
- Always verify the installer’s digital signature after download, before you run the file.
Portable build
- Unpack to a flash drive or second volume when C: is the disk you need to scan.
- Reduces new writes on a sick system disk compared with a full install.
- Handy for “one-off” recoveries on someone else’s laptop without leaving shortcuts behind.
Whatever you choose, download only from a vendor or mirror you trust. If the filename, size, or signature looks off, delete it and try again from a different channel.
11 · Limits
When to stop clicking “scan again”
Free tools help many people, but hardware failure, encryption without keys, and RAID mistakes need different tooling and sometimes a clean-room lab.
Pause DIY if you see this
- Clicking, beeping, or disappearing drives in Disk Management. Power down; repeated power cycles can destroy platters.
- RAID arrays or NAS boxes where more than one disk failed. Cloning the wrong member makes pro recovery harder.
- Full-disk encryption without your password or recovery key. Software cannot guess keys for you.
Still worth trying at home
- Accidental delete on a drive that sounds healthy and stays online.
- Formatted the wrong USB stick once, then unplugged it.
- Deep scan shows candidates but previews look odd; recover a sample and open it in the real app.
12 · Layout
Filesystems Windows keeps throwing at you
Recuva cares about how the volume is organized, not the sticker on the box. These one-liners explain what most home users actually run into.
NTFS
Default on internal Windows disks. Journaling helps metadata survive abrupt shutdowns; still not magic after heavy overwrites.
FAT32
Common on smaller or older flash. Remember the 4 GB per file limit when you wonder why a video “vanished.”
exFAT
Large SD cards and drives shared with Macs. Often what a camera formats by default today.
ReFS
Shows up on some servers and advanced setups. Expectations for classic undelete differ; backups matter more.
If Windows offers to format a drive you still need, say no, then read the Scenarios page before you let any tool rewrite the partition table.
13 · Field notes
Patterns we hear in real support threads
Composite stories, not testimonials. They show how small choices after a delete change the outcome.
“The SD looked empty after a bad eject. Deep scan took forever on an old laptop, but most of the trip folder came back with odd names.”
“Every mirror added toolbars. I grabbed the portable build from a vendor I already trusted and recovered to an external HDD.”
“The laptop SSD showed almost nothing recoverable. TRIM had already cleaned blocks. Cloud backup saved the thesis.”
14 · After recovery
After files land on the safe disk
Getting bytes off the sick volume is only half the job. A calm verification pass saves you from celebrating a corrupted wedding video or a zero-byte “document.”
Open in the real app
Launch photos in a viewer, documents in Office or LibreOffice, archives with 7-Zip. Thumbnails and Recuva’s preview pane can lie.
Copy, then back up
Move verified files to a second location: another drive, NAS, or cloud you control. Keep the recovery folder until you are sure.
Scan if it lived on the web
If the disk ever ran unknown installers or dodgy downloads, let Windows Defender (or your AV) look at the recovered folder before you merge it into clean projects.
15 · Background noise
Quiet the PC while you scan
Every background writer competes with recovery. Pausing them is not superstition; it is fewer overwrite chances on a crowded disk.
You do not need to uninstall anything. Exit or pause the heavy hitters for the hours a deep scan might run, then turn them back on when you are done verifying files.
- OneDrive, Dropbox, Google Drive, iCloud for Windows — pause sync or exclude the scanned volume until recovery finishes.
- Steam, Epic, Battle.net, Xbox app — updates and shader caches write large patches to disk; close launchers during fragile scans.
- Browsers and IDEs — heavy downloads, dev servers, and Docker volumes can touch the same SSD you are trying to read.
- Windows Update — if a feature update is pending, consider postponing it until after you have copied recovered data somewhere safe.
- Backup jobs — Macrium, Veeam agent, File History, and “smart backup” suites can rewrite large chunks of the volume they protect. Pause or reschedule until recovery is finished.
- Scheduled AV and “quick” scans — full-disk sweeps and aggressive real-time hooks touch the same sectors you are hoping to read cleanly. Snooze heavy scans for the window you need.
16 · Reality
Myths we still see in search results
Short reality checks so you do not waste a night on a promise the physics of storage cannot keep.
| Myth | What actually happens |
|---|---|
| “Deep scan reads every byte perfectly.” | It is a best-effort pass with false positives. You still judge each file by opening it. |
| “Payware always beats free tools.” | Price does not rewrite TRIM or a head crash. Sometimes the data is simply gone. |
| “Chilling the drive fixes bad sectors.” | Temperature tricks belong in old forum folklore. Unusual cold can add condensation risk. |
| “The Recycle Bin stores everything forever.” | Policy, disk quotas, and shift-delete bypass it. Emptying the Bin is often final for quick undelete. |
| “One hundred percent recovery guaranteed.” | Treat that phrase as marketing. No honest lab promises a full tree after heavy overwrites. |
For licensing scope and what this site does not do, see the FAQ.
17 · Snippet
Questions people open first
Short answers here; the FAQ page goes deeper on licensing, guarantees, and filenames after deep scan.
Is Recuva free to use?
A free tier has long been offered for personal recovery. For commercial use, confirm the current license with the build you install. Terms can change between releases.
Can any tool guarantee file recovery?
No. Outcomes depend on overwrite history, drive health, filesystem, and SSD TRIM. Treat status labels as hints until you open the recovered file in its real application.
Why did filenames disappear after a deep scan?
Directory entries are often gone; deep scan rebuilds from file signatures. Data can survive with a generic name, size, and partial path. That is expected, not a failed scan.
Download now
This site does not host installers. Search for Recuva for Windows and use a source you trust, or open the publisher’s page. Let SmartScreen and signature checks finish before you run the file.
Download nowWith JavaScript enabled, the button gets a new direct link on each load; if scripts are off, the official publisher URL above is used.